Saturday, October 30, 2021

Taiwanese Sesame Oil Chicken (麻油雞)


Taiwanese Sesame Oil Chicken, not to be confused with the Sesame Chicken, is a popular dish in Taiwan especially for new moms and during the Winter.  It's made of chicken, sesame oil and Taiwanese rice wine.  I used a recipe from a youtube video which also used goji berries.  That was a Chinese-only video though.  For non-Chinese speakers, I also included a second video which was close to how I made it.

Because I used the cooking rice wine which contained a little salt already, I didn't use any salt at all for this dish.   Additionally, because of its low alcohol content, my dish didn't flame up as in the video.  Last but not least, I used my cast iron the whole time without the need to switch from a wok to a pot.  Despite all that, the soup was surprisingly yummy and it warmed up my whole body.  Nice!

Youtube:

Monday, October 18, 2021

Ginger Scallion Lobster (蔥薑爆炒龍蝦)


This is my first Ginger Scallion Lobster.  In fact, this is my first lobsters for a very long time.  

If you are like me, don't want to or don't know how to deal with live lobsters, feel free get some lobster tails from Costco or any online stores such as Amazon.

Here are some tips:
  • Since I was making this at home, I used less oil and fried the lobsters in batches.
  • Be sure to use hot water instead of cold water at the end; otherwise, by the time the water was boiled, the lobster would be over cooked.
The end result is very tasty and tender ginger scallion lobsters.  Yum!

Youtube:


Sunday, October 17, 2021

Stir-fried Tomato and Egg (番茄炒蛋)


My family and I love stir-fried tomato and egg, and it's very easy to make.  This is one of those which was passed down to me verbally.  There are also many youtube videos available, so I just pick one that closes to how I usually make it.

I, however, have several tricks to share:

  • My first trick is to add salt or garlic salt in the eggs and sugar in the tomato, then mix them together.  Adding sugar in the tomato makes it easier to balance the sourness and sweetness.  This also results more layers in the taste at the end.
  • Another trick is the order how I cook it.  I usually stir-fry eggs first and tomato second.  This way, I don't need to wash the pan between cooking the eggs and tomato.
  • Last but not least, when stir-frying the eggs, I only cook them for about 70% done, then pour them on a plate.  Then, using the same pan, I start cooking tomato as mentioned above.  After seasoning the tomato, I add the eggs back to the pan and mix them with the tomato, and finish cooking the eggs there.  This way, the eggs won't be over cooked.

Youtube video:

Saturday, October 16, 2021

My First Banana Bread


This is my first banana bread and my first non-youtube recipe.  I used the less sweet recipe, ie. 1/2 cup of sugar instead of 3/4 cup.  The bread was still very good, especially when it was still hot.  Now, the pictures make me want to start my 2nd.  Lol.

Recipe:

Friday, October 15, 2021

Pan fried Salmon


Salmon from Costco, cut into smaller pieces, added some salts and black peppers, pan fried with butter, medium rare.  Crispy outside, soft inside.  Very tender and tasty!

Thursday, October 14, 2021

Cast Iron Rice (or Clay Pot Rice or 煲仔飯)


Clay Pot Rice, as its name suggests, is usually cooked with clay pots.  Mine was broken years ago, so, I used my combo cooker (a cast iron) instead, hence, the name Cast Iron Rice :)

The readers should know me by now, I don't usually follow the recipes to the letter.  There is no exception in this case as well.  The top 2 pictures above, I used Chinese sausages, and the 3rd one I used a pack of Italian sausage from Costco.  In other occasions, I used Costco rotisserie chicken (yes, cooked), pork (also cooked) or any leftover meats (yes, also cooked) in my fridge.

I like Cast Iron Rice (or Clay Pot Rice) because it has rice, meats, veggies and I often crack a couple of eggs as well.  The cooking usually takes about 20 minutes.  I don't usually bother to soak the rice in water  in advance because I enjoy harder rice better.  The first 10 mins is the time to cook the rice.  During which, I usually prepare the sauce, veggies, slice the meat or debone the chicken.  After that, I add all the ingredients into the plot, wait for another 10 minutes.  That's it.  It even has the burned rice at the bottom.  

It's a quick and predictable way of having a nice meal during a hectic day.

Wednesday, October 13, 2021

Liangpi (Cold Skin Noodle or 凉皮)


Liangpi literally means cold skin, but, it's made from wheat or rice flour.  Despite its name, it is served all year round and very popular in China.

In a nut shell, the whole process took about 5 to 6 hours, mainly waiting for the gluten separated from the starch.  Again, I bought the chili sauce from a local asian supermarket or online to make things a little easier.  Also, I didn't usually follow the recipe to the letter; I used whatever veggies I had left in the fridge, in this case, green peppers and carrots instead of cucumbers.

Youtube:

Tuesday, October 12, 2021

Cantonese-style Chang Fen (腸粉)


Instead of mixing the rice flour, wheat/tapioca starch and potato starch, I bought several ready to use mixed flour packages from a local asian supermarket.  For the rest, I followed the instructions from the youtube video.  As you can see from the pictures, I did the pork Chang Fen and the sauce was a very nice touch!

Youtube video:


Monday, October 11, 2021

Wet Chow Ho Fun (滑蛋虾河粉)


In my previous blog, I made Dry Chow Ho Fun.  Today, I made Wet Chow Ho Fun (shrimp version).

One thing to watch out for is to pan-fry the shrimps to about 70% done.  The reason being that we will need to thicken the gravy with shrimps in it at the end with cornstarch and eggs, and the shrimps will be fully cooked there.

Youtube video:


Sunday, October 10, 2021

Saturday, October 9, 2021

Red Bean Sourdough


Have some red bean paste leftover from the previous Baked Red Bean Rice Cake?  No worries, use it for a red bean sourdough.

I started the red bean sourdough the same way as a traditional sourdough bread, except before the shaping, I stretched the sourdough wide open, laid the red bean paste on top, then wrapped the sourdough into a dough ball and into the proofing basket.

There are many sourdough making videos.  I'd watched so many and made many, but, I'm listing only one below for your reference.  The red bean paste was simply my addition.  In the next few days, I'll document my sourdough journey.  For now, enjoy the red bean sourdough.  

Youtube:

Friday, October 8, 2021

Baked Red Bean Rice Cake (烤红豆年糕)


After Crispy Pork Belly and Porchetta, maybe it's time for a dessert.

Chinese baked red bean rice cake or its variants is a must for Chinese New Year or anytime you feel like a sweet dessert without too much effort :)

The youtube video below also shows how to make sweet red bean from scratch.  For people like me, a trip to any supermarket to buy a can of red bean paste would do just fine.  Yummy!

 Youtube:

Thursday, October 7, 2021

Porchetta (義大利脆皮燒肉)


After making crispy port belly for so many times, I'd wanted to try something difference.  Turn out Porchetta is very similar to the crispy port belly, except seasoned with different ingredients, rolled and tightened with cooking twine.  The main difference, in my humble opinion, is that all the skin of the crispy port belly will be crispy since it is cooked flat while only the top skin of Porchetta will be.

Anyway, it's good to try different cookings.

Youtube video:

Wednesday, October 6, 2021

Crispy Pork Belly (脆皮燒肉)


There are many Youtube videos on how to make crispy pork belly.  As usually, I combined the best from different videos: after boiling the skin of the pork belly for 10 minutes, poking holes on the skin and seasoning the meat on the other side, I used coarse salt to seal the top skin and dried the skin in the fridge for at least a couple of hours although over night was recommended.  The key was to dry the skin so that it would be very crispy.  After pre-heating the over to 400 F, I took the pork belly out from the fridge and straight to the oven for 1 hour.  After that, I removed the salt from the skin and moved the pork belly to the lower level in the oven so that the heat was on the top, then I turned the oven to the High Broil setting.  I let the pork belly sitting there for 10 to 20 minutes or until its skin was brownish and crispy.  During which, I sat next to the oven and made sure to cover portion of the skin that was about to burn with aluminum foil.  That was it.  Enjoy your crispy pork belly.

Youtube videos:

Tuesday, October 5, 2021

Homemade Scallion Pancakes (蔥油餅)


I liked Inga Lam's videos; she made many different dishes I liked from scratch.  Scallion pancake is one of them.

Youtube video:

Monday, October 4, 2021

Homemade Spam Sushi (午餐肉壽司)


Sushi is a traditional Japanese dish made from rice with vinegar and sugar, paired with raw fish such as salmon or tuna.  Together with cucumber and carrots, the rice and fish are wrapped with a black seaweed sheet.  At least that's my understanding of sushi.  Of course, there are many different varieties and I just love them.

On the other hand, I also love spam.  You know, the ones come with metal cans, not those from the emails.  A couple decades ago, I was thinking: what if we could get the best out of both worlds?  Since, Spam Sushi was born!

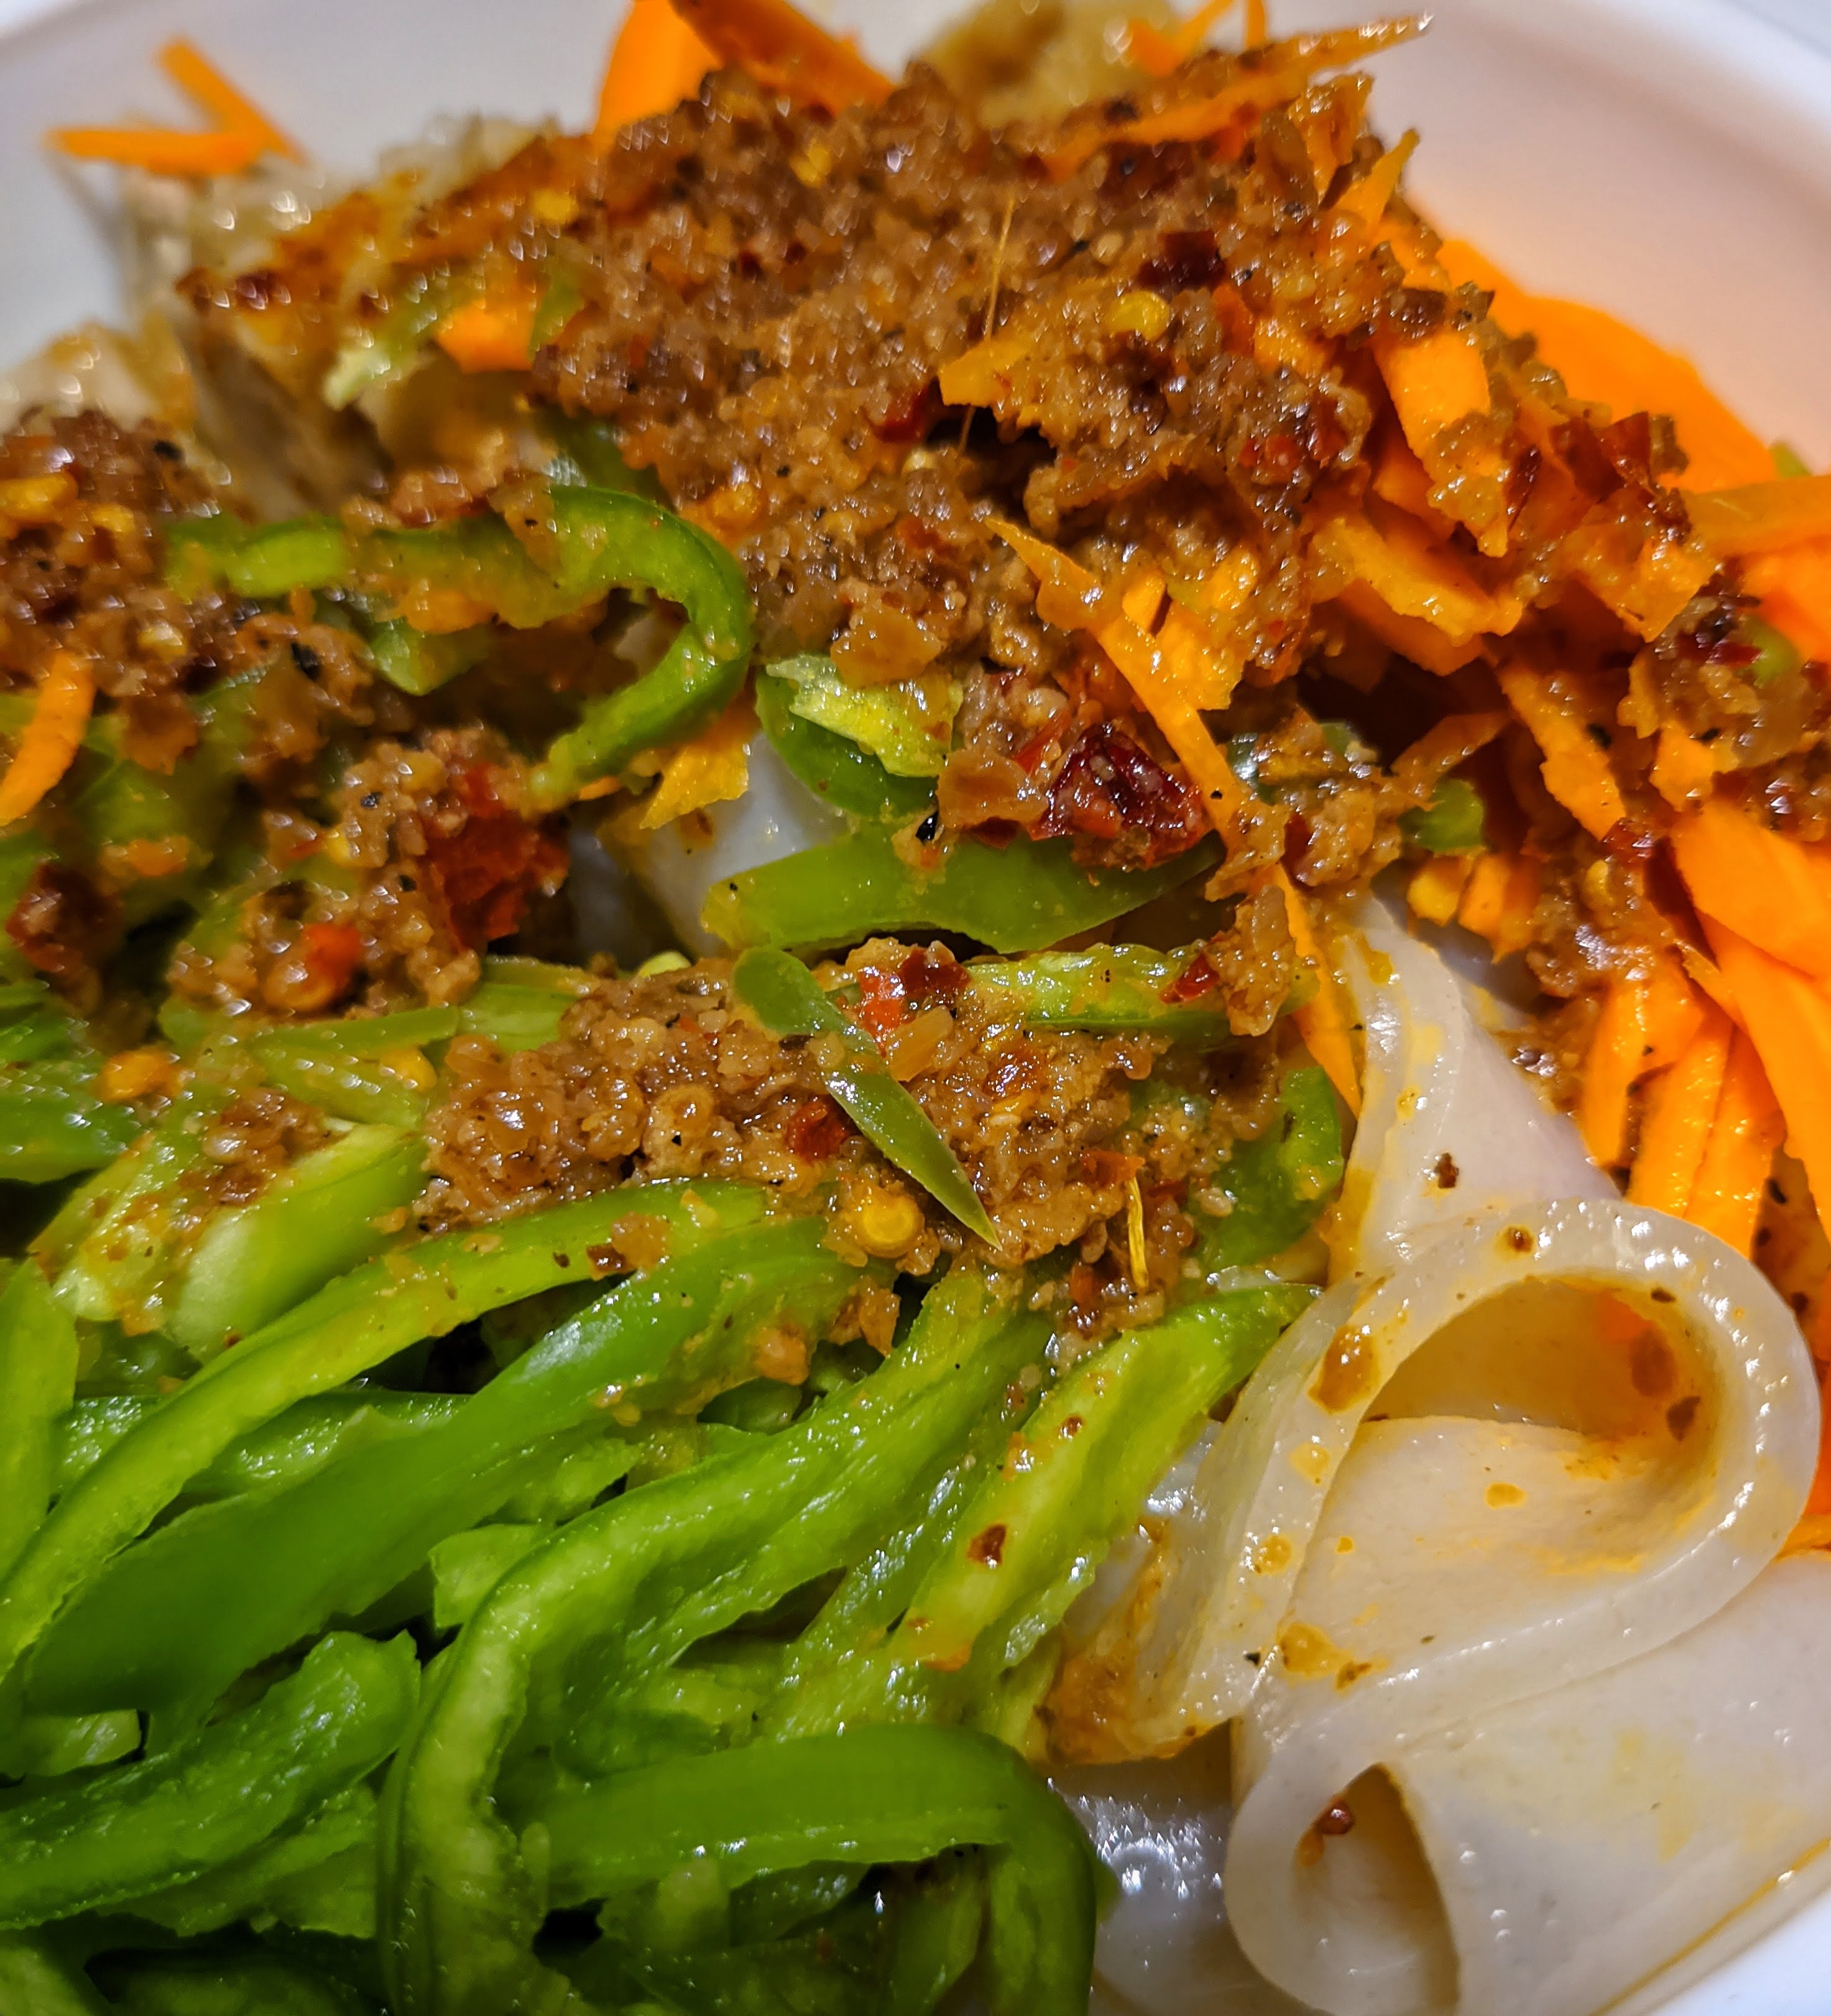
For sushi, I don't need any youtube video to follow.  It was a long time ago, I might have learned it from a friend verbally and known it by heart since.  I don't care if I'm using the short grain rice; I usually use whatever rice I have in my kitchen.  In my case, usually it means the long one.  I used to use a special vinegar for sushi, now, as long as it's light color vinegar, I'd use it.  When the rice is cooked, while still hot, I would spread some vinegar onto the rice, stir well and balance the sourness with some white sugar.  Beforehand, I would slice the spam, cucumber and carrots into strips.  Last but not least, I would buy some rice seasoning and seaweed sheets online or from a local asian supermarket.

To assembly a sushi roll, I use a bamboo rolling mat.  First, I take a black seaweed sheet out from the package, lay it on top of the bamboo rolling mat.  Then, I spread the rice evenly and thinly on the seaweed sheet followed by a generous layer of the rice seasoning.  After that, I lay two strips of spam head-to-toe because the  seaweed sheet is usually twice as long, followed by two strips of cucumber and carrot, also head-to-toe.  As a last step, I roll the bamboo mat such that all the ingredients are tightly packed within the seaweed sheet.  After that, I repeat the same steps until I run out of the ingredients or patience, whichever comes sooner.

To serve, I usually wet both sides of the knife before cutting the sushi into pieces, and I would repeat wetting the knife after a few cuts.  This is to prevent the rice from sticking on the knife and ruin the subsequent cuts.  For best presentation, I usually trim out the edge pieces of the each sushi roll and make  those disappear entirely in my stomach :)

Sunday, October 3, 2021

Wontons (雲吞)


In the previous blog, I mentioned I followed Inga Lam's homemade dumpling video for the potstickers.  For wontons, I followed the same recipe for the ingredients/fillings.  Instead of making the homemade dumpling skin, I bought a couple of wonton skin packages from an Asian supermarket.  From the pictures, you can tell I was doing the method #6 for wonton wrapping from the "How to wrap wonton" video.

Hmmm... yum!

Youtube:

Saturday, October 2, 2021

Potstickers (鍋貼)


A while ago, Youtube recommended me Inga Lam's youtube channel.  One of the videos stood up: her homemade dumplings.  In the video, she also used the dumplings to make potstickers, which caught my eyes.  

So, I followed her recipes, including the skin and fillings, and made some potstickers.  From the picture above, you could clearly see some burns.  That was definitely something I needed to improve upon.  On the other hand, some actually loved the burns and their extra crispiness.  Maybe the burn was a feature, not a bug after all :)

Youtube video:

Friday, October 1, 2021

Crispy Fried Shrimp Cake (香脆炸蝦餅)


A few weeks ago, I tried to make Crispy Fried Shrimp Cake, a popular snack in Malaysia.  I based off the recipe from the youtube video listed below with some modifications:

  • I used general purpose flour, some tapioca flour and water as the batter;
  • I only added shredded carrots and green onion to the batter;
  • I did, however, added some oatmeal, trying to increase its crispiness;
  • Last but not least, instead of scooping the batter into the hot oil directly, I submerged a large metal spoon into the hot oil first for a couple of minutes, took the spoon out of the hot oil, poured a thin layer of batter onto the spoon, then topped the batter with a shrimp before dipping it into the hot oil.

The fried shrimp cakes were tasty, but, become soften when they got cold.  So, we finished them before they got cold :)

Youtube video: